DIY Galvanized Stock Tank Planter
- Dana Tutela
- Feb 26, 2024
- 5 min read
Updated: Jun 14, 2024

Turn a galvanized stock tank into a planter filled with flowers and edible plants!
One of my favorite raised bed ideas that I have implemented in my garden is the galvanized stock tank planter. When I started suffering from lower back pain, I turned to raised beds that were at least 24" tall and these fit the bill. If you are considering stock tanks for your garden, continue reading for several helpful tips and a couple mistakes to avoid.
Read about gardening with physical limitations in Gardening with Mobility Issues

Please keep in mind that I may receive commissions at no expense to you when you click my links and make purchases. However, this does not impact my reviews and opinions. I only endorse products or services that I believe are worthy of such an endorsement. Link to full privacy disclosure here.
Plan Your Garden Carefully!
Take the time to envision your stock tank garden and its requirements. What are you planting and what amount of sunlight is required for those plants? If this is a mini vegetable garden, choose a site with 7-8 hours of direct sun. This was my first mistake with raised bed gardening. Most vegetables will not grow in the shade.
How many planters do you need? Check out the Square Foot Gardening book to help plan a productive garden with limited space. What root depth will your plants need? Garlic, spinach and lettuce for example are shallow rooted plants. Tomatoes, squash and okra on the other hand, require deeper root depth. I like the 24" tall tanks to ensure plenty of soil for roots to grow.

At the same time, consider the height of the mature plant added to the height of your planter. This was the second mistake I made with raised beds. I couldn't reach the tops of my blackberry plants!
Is there a water source near the beds? Dragging hoses and water cans is not fun! Consider using drip irrigation for ease and consistency.
Once tanks are filled with soil, they are very heavy! Plan accordingly because they are not going anywhere once they are in place! Is this for a patio? Add industrial casters to the bottom so that you can move them if necessary.
Prepare Your Site
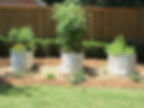
Depending on your site and personal preferences, you may or may not need to do much to prepare. I've seen plenty of tanks placed right on the grass or dirt ready to fill. For our slightly sloped area, we chose to create a large rectangular shaped base layer of gravel and sand to create a level foundation for our three stock tanks with plenty of walking room around them. Think about the walking space between each tank carefully to make sure you have enough room for a wheelbarrow. Next we laid out several leftover flagstone pavers where each tank would be placed. This allowed for improved drainage and a solid level foundation underneath them.
Ginger Tip: If you want to connect tanks with a trellis, plan the distance between the beds accordingly now to ensure a proper fit.
Prepare Your Stock Tanks

The stock tanks, as you probably know, are actually water troughs for livestock. Therefore, there is a brass plug and drain hole typically on the side for routine cleaning. This drain hole is a few inches up the side and not on the bottom. For gardening, you will need more drainage than this one small hole on the side. Otherwise, water will sit stagnant in the bottom. Plan to drill (with a bit designed for metal) several large holes in the bottom of the tank before going any further.
When I purchased galvanized stock tanks for my future vegetable garden, I worried about the galvanization process and chemicals leaching into the soil and being taken up by the plant roots. After extensive research, I learned that the process involves coating metal tanks with zinc to prevent corrosion. Zinc is not necessarily toxic. In fact we use it as a mineral to boost immunity and fight off colds. It does become a problem, however, when inhaled through sanding or grinding. It's also problematic if corroded through acidic products. This is why we don't eat off of galvanized utensils. Read about the galvanization process as explained by the American Galvanizers Association here. Even though the studies show that the tanks are safe for growing edible plants, I chose to seal the inside of the tank with a food grade paint that vintners use for winemaking.
I scrubbed the insides of the tanks, rinsed them thoroughly and allowed them to dry completely. Then I painted the interiors with the paint I purchased specifically for this.


For aesthetic purposes, I painted the outside with a white primer and then finished with my favorite creamy white paint, Alabaster by Sherwin Williams. Have fun with this part! I've seen some tanks painted robin egg blue, sunflower yellow and even terracotta red. I think painting birds and flowers on the outside would be darling for a children's garden. Get creative!
Set Your Planters in Place
With your site properly prepared, set your planter(s) in place. Check measurements for spacing and adjust if necessary before filling with dirt. Also make one last check to make sure they're level.

If you plan to use drip irrigation, now would be an opportune time to run the main tubing through the drain hole on the side. It's not imperative to do it this way, but it would look cleaner to hide the hose from the outside.
If you plan to connect two tanks with a trellis (ie: cattle fence panel trellis), now would also be a good time to add it.
Fill the Planters
Before adding soil to the planters, add a layer of gravel or rocks in the bottom to help keep the drain holes clear.

If you look at the photo above, you will notice a cinder block placed in front of the drain hole. I made this to attract frogs/toads to help with bugs. Apparently the damp cavern is a natural hideaway for them. It didn't work for me, though. In fact, I ended up with wasps in one! Third mistake? I also probably added too many rocks. We had these left over from another project and wanted to use them up.
Next add a layer of debris such as dead branches, leaves, lawn clippings (herbicide free), and twigs. These will take up space and break down into natural compost material with time. If your tank is 12" high, you might not have room for branches, but smaller organic material should be fine.

Fill the rest of the planter with nutrient rich soil and compost. I was shocked at how much soil was needed to fill them all the way up!
In my experience, I need to add more compost to my raised beds after each season. Material breaks down and compacts over time. The new compost replenishes the nutrients and builds back up the soil for the next round of plants.
*Ginger Tip: Add red wigglers to your raised bed to help break down the debris and to provide natural worm castings to the soil. I bought mine on Amazon and they arrived alive and wiggling!
Continue setting up your drip irrigation, if appropriate.
Finally, add your plants/seeds. Water and enjoy your new raised bed!

Your DIY galvanized stock tank is now a beautiful functional planter that will last for years to come!
For more information about raised beds, read The Pros and Cons of Raised Beds.
